What Are Blocks in Squarespace?

It’s no secret I’m a one platform kind of girl and 100% devoted to using Squarespace for all of my design. Read about why here! Squarespace undeniably has a bit of a learning curve, so let’s go over some basics. Curious about blocks and what the heck they are and how to use them?!
Let’s dive in!
Blocks Explained
Blocks are sections of content in Squarespace you can edit or add (drag and drop.) These include text blocks, image blocks, code blocks, etc. Blocks are literally the building blocks of your website- they are like puzzle pieces that form a whole- a well balanced site.
In web design and development, blocks are usually referred to as “divs,” which is a division or section of a website. Divs can be various sizes and contain more divs within them. For the purpose of Squarespace, it’s less confusing to refer to these as “content blocks.” You will likely be working with these content blocks one at a time, and only would need to know what content is nesting within other content if you are doing some advanced code.
What’s so great about Squarespace blocks? I like that they act somewhat like plugins, which makes it super easy for you to add all kinds of content by simply dragging and dropping. But don’t assume that you are stuck with a cookie cutter website! The customizable content blocks allow you to make it your own and divert from a template.
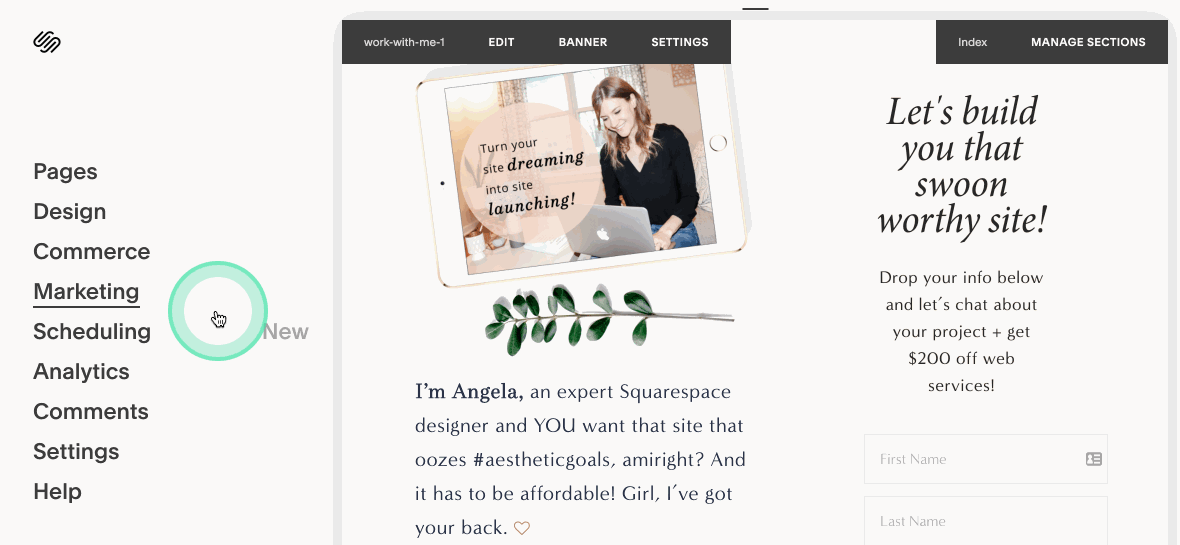
Below, I have a section of one of my landing pages designed in Squarespace. I have marked the different content blocks, so you can identity what these look like in:

Now that you have a better idea of what content blocks are, let’s look at how to add them!
How to Use Blocks
Let’s walk through how to use and add content blocks and the difference between using these in Squarespace 7.0 and 7.1.
Squarespace 7.0
If you are using a template from Squarespace 7.0, this is how you locate content blocks:
You can start with a blank page by going to “Pages” and clicking the “+.” Go ahead and choose a “Blank Page” for now instead of the other layouts available— that way you can completely customize this page by dragging, dropping and rearranging content and you’ll get some practice.
OR, you can always work from a template— you do you!
Hover on any page section, until a menu bar appears at the top and click “Edit.”
Either click the “+” in the upper right corner, or choose an insert point by hovering over a section where you want to add content.
PRO TIP: Use the insert points if you know where you want to position your block. You can always rearrange later.
Adding content block at insert point ↓

Squarespace 7.1
If you are using a template from Squarespace 7.1, this is how you locate content blocks:
(Repeated from #1 above) You can start with a blank page by going to “Pages” and clicking the “+.” Go ahead and choose a “Blank Page” for now instead of the other layouts available— that way you can completely customize this page by dragging, dropping and rearranging content and you’ll get some practice.
OR, you can always work from a template— you do you!
Click “Edit” in the top left corner of the page.
Hover over a section of the page you want to add content and click an insert point, shown below.

Adding a Content Block
There are a couple of ways to drag and drop a content block. For these examples, I’ll show you how to add a simple text box, since this is one of the most commonly used blocks.
Adding Content Block At Insert Point
Insert points help guide you to a spot on your page that you can add a content block.
Click “Edit.”
Hover over a section where you want to add content so that an insert point appears. If this insert point isn’t precise, that’s okay! You can move the block after it is added.
Click an insert point to open the content block menu. Select your content block (in this example, it’s the “text block.”)
Add text inside of your text block and click “Save”!

Drag and Drop Content
Click “Edit.”
Click “+” in the top right corner (if using 7.0), or choose an insert point and click.
Select the “text block” by clicking and holding down on your mouse to drag it into position.
You can see black lines showing up as the content block is dragged. These are markers to show you where you can move the content on the page. Pretty nice, right?!
Don’t forget click “Save!”
In Squarespace 7.0, if you just click on the “+” and click on a content box without holding the mouse down and dragging, the block will appear at the bottom of your page or section you are trying to edit.
Squarespace 7.0 Drag and Drop:

Squarespace 7.1 Drag and Drop:

Moving a Content Block
Click “Edit.”
Locate the content block you wish to move and hover over it until the hand or drag icon appears.
Start dragging the content block across the page. You’ll see the back lines showing up as guides to show where you can place the content.
Note: you can only move a content block within a single section of your page. You cannot move content across different sections.

Block Types
Below the layout of the content block menu you’ll see in Squarespace. The most commonly used blocks are at the top of the content block menu. These are listed as “Basic.”
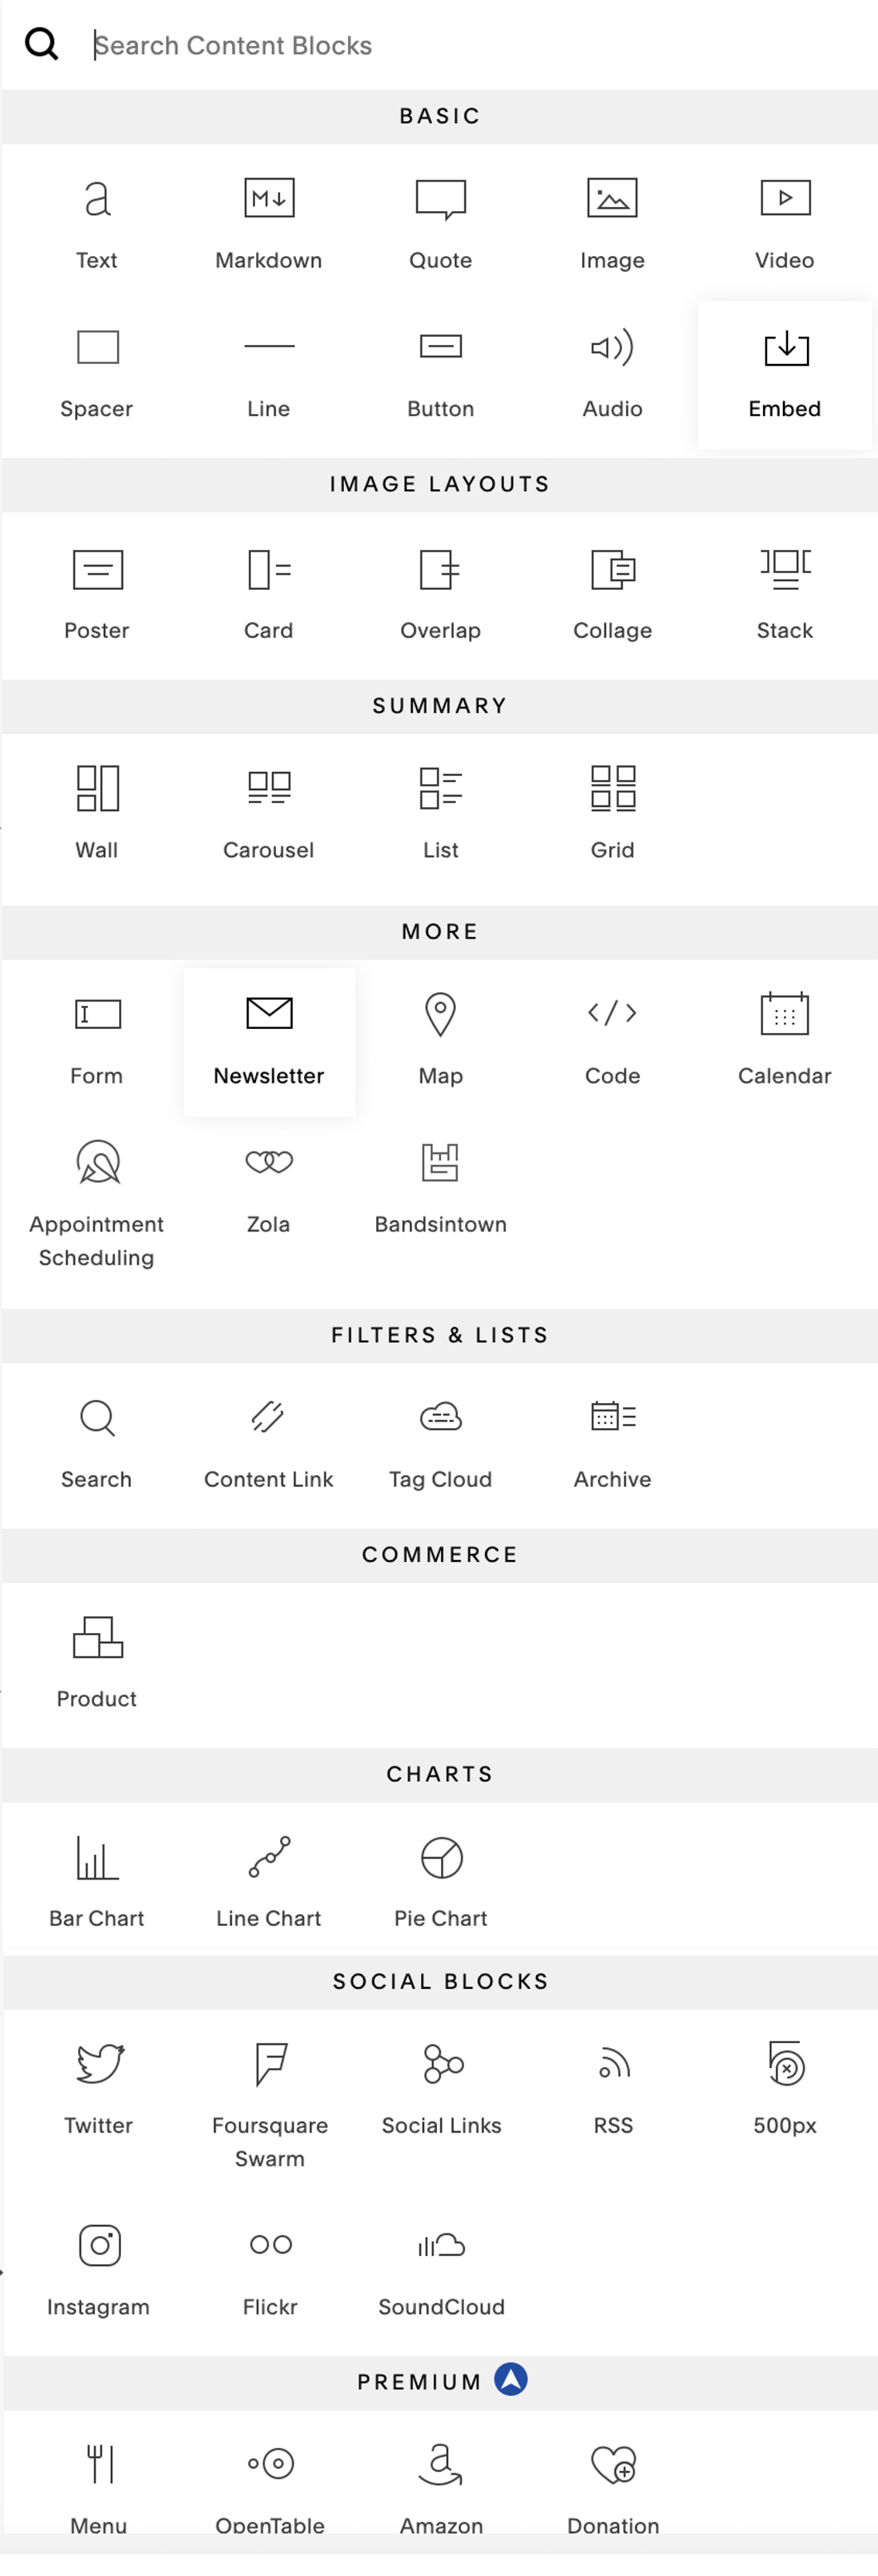
The following list details each content block and what it does.
PRO-TIP: Keep it simple! Don’t go crazy with content blocks, just because you have options. Only use what you need!
500px - Add images from your 500px account.
Acuity - Add online booking with Acuity Scheduling.
Amazon - Link to Amazon items. This is useful if you participate in Amazon's Affiliate program.
Archive - Display organized lists of links to collection items.
Audio - Add players for audio files.
Bandsintown - Display tour dates from your Bandsintown profile.
Button - Add buttons and calls to action.
Calendar - Display items on your pages, like events, as a calendar sorted by day.
Chart - Add bar, line, and pie charts.
Code - Add custom code or display code snippets.
Content Link - Add links to other pages on your site with visual previews.
Donation - Collect donations to your cause or organization. Requires a connected Stripe or PayPal account.
Embed - Add external content with links to tweets, videos, and more.
Flickr - Add images from your Flickr account.
Foursquare - Add feeds of your Foursquare check-ins.
Form - Add forms to collect information from visitors.
Gallery - Add galleries of images or videos in Carousel, Grid, Slideshow, or Stack layouts.
Image - Add images with captions in Card, Collage, Inline, Overlap, Poster, or Stack layouts.
Instagram - Add posts from your Instagram account.
Line - Add horizontal lines to break up text or visually separate content.
Map - Add Google Maps with location pins.
Markdown - Add text using the Markdown language.
Menu - Display restaurant menus.
Newsletter - Add newsletter subscription forms.
OpenTable - Add restaurant reservation booking. You'll need an OpenTable Restaurant ID.
Product - Display products from Products Pages.
Quote - Add styled quotations or testimonials.
RSS - Add links to Blog Page RSS feeds.
Search - Add search fields.
Social Links - Add icons that link to social media profiles.
SoundCloud - Embed SoundCloud players.
Spacer - Add adjustable amounts of space or padding between blocks.
Summary - Display collection items from your site in Carousel, Grid, List, or Wall layouts.
Tag Cloud - Display tags or categories in a graphic cloud formation.
Text - Add text, including headings, quotes, pre-formatted text, links, and lists.
Twitter - Display feeds of your most recent tweets and a follow button.
Video - Add externally hosted videos.
Zola - Add wedding registries.
(List source: Squarespace.com)
These are the basics of using Squarespace blocks. Now, get to it! Let’s see how creative you can get with building some custom layouts for your site using blocks! Drop a comment below.
Angela